You can either follow along with this tutorial or download the completed source code on github: https://www.github.com/carlosmontes/slideoutmenu.
Expected Results
This is a very basic introduction to what is possible for this type of interaction on iOS. By the end of the tutorial you should have a better idea of how to use Auti Layout combined with UIView animations and Drag Gestures to get the desired effect of a slide out menu.
You should end up with something like the following if all goes well:
What You’ll Need
- A recent version of Xcode
- CocoaPods CLI Installed
- SnapKit framework
Getting started
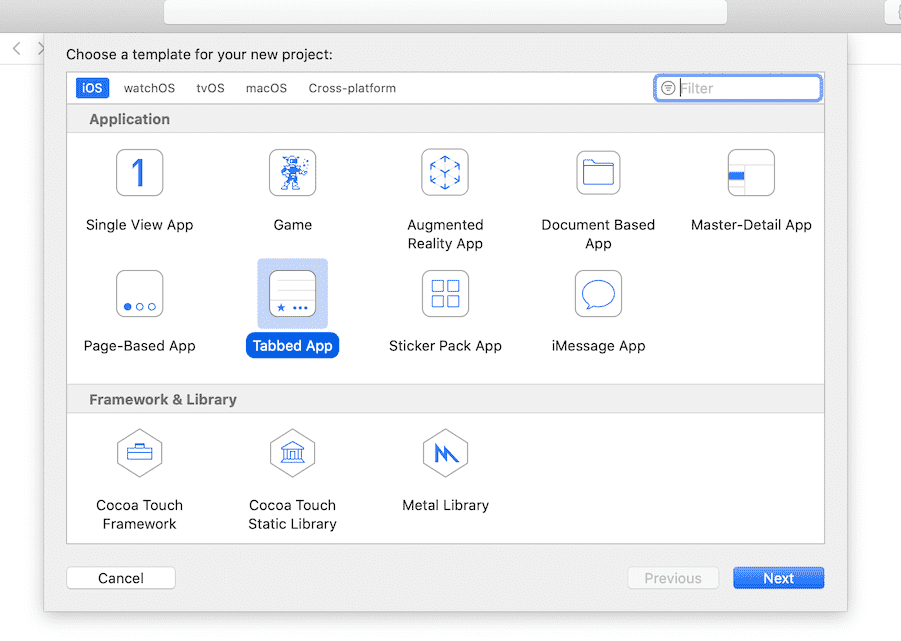
Let’s get started by creating a new Tabbed App in Xcode (You can use any other starter template for this but I chose a Tabbed App because it is not as trivial as a single view). Name it SlideOutMenu.
Once you’ve created your project exit out of Xcode and open up a Terminal window. Navigate to your project directory and run the following command:
> pod initThis will create a new Podfile for your project. Open up the Podfile in your favorite text editor and add the following line to your target:
pod 'SnapKit', '~> 5.0.0'Mine looks like this:
Save your Podfile and go back to your Terminal window and run:
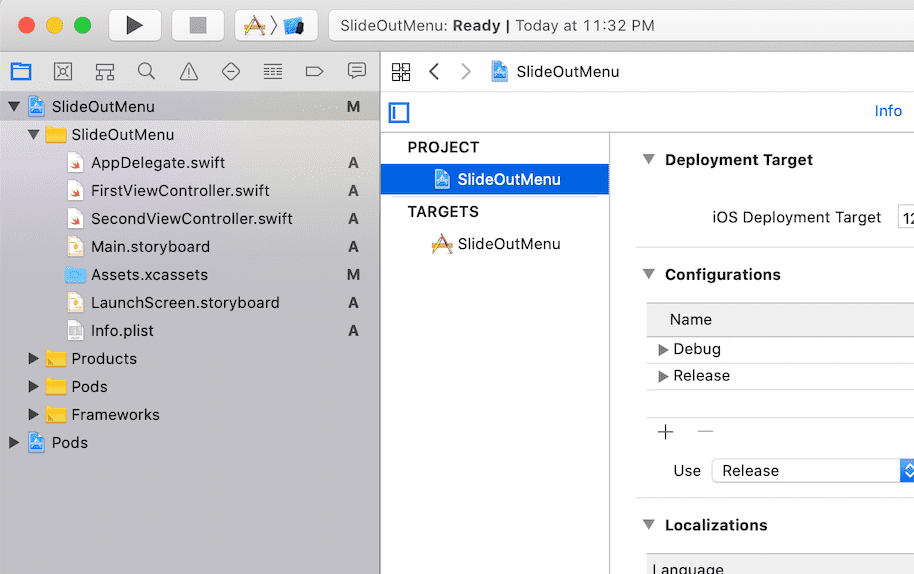
> pod installThis will install your dependencies and create a new file SlideOutMenu.xcworkspace. From now on you will use this file instead of the default xcodeproj file. Open up the xcworkspace file and take a look around. If everything went well then you should have something that looks like this:
Preparing the Project
Now we will get rid of our Main.storyboard since we will programmatically create our views.
Go to your Xcode project and in the files navigator select Main.storyboard and delete it (Move to Trash). Run your app and you should get the following exception:
Could not find a storyboard named ‘Main’ in bundle NSBundle
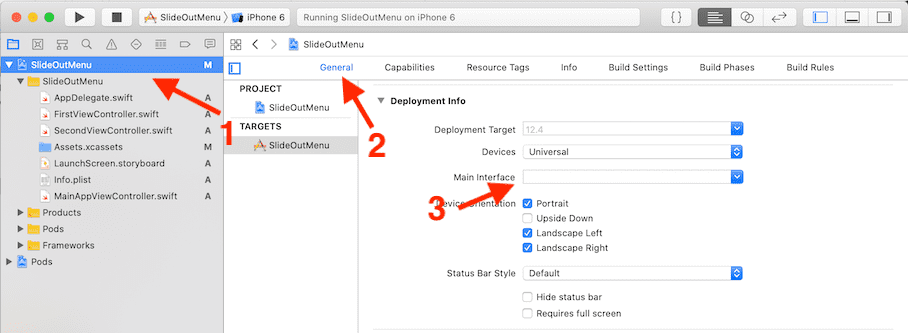
We need to remove Main.storyboard as our Main Interface (i.e. initial screen after the Launch Screen).
To do this, 1) click on the SlideOutMenu project from the File Navigator then click on the target. 2) Make sure you are on the General tab and scroll down to the Deployment Info section. 3) Here you will see that Main is defined. Delete it and save your project.
Run your project again and now you should get a black screen after launch.
Update Existing View Controllers
We will be creating our tabbed view programmatically which means that we will need to set the tab bar items on each of our view controllers (FirstViewController, SecondViewController). In order for the tab bar items to show up on our tab bar we need to add initializers to our view controllers.
Open up FirstViewController and add the following code:
  init() {
    super.init(nibName: nil, bundle: nil)
    self.tabBarItem = UITabBarItem(title: "First View", image: UIImage(named: "first"), tag: 0)
  }

  required init?(coder aDecoder: NSCoder) {
    fatalError("init(coder:) has not been implemented")
  }
Open up SecondViewController and do the same but changing the image for the tab bar item and the tag:
  init() {
    super.init(nibName: nil, bundle: nil)
    self.tabBarItem = UITabBarItem(title: "Second View", image: UIImage(named: "second"), tag: 1)
  }

  required init?(coder aDecoder: NSCoder) {
    fatalError("init(coder:) has not been implemented")
  }
Both of your classes should look very similar to the following:
import UIKit

class FirstViewController: UIViewController {

  init() {
    super.init(nibName: nil, bundle: nil)
    self.tabBarItem = UITabBarItem(title: "First View", image: UIImage(named: "first"), tag: 0)
  }

  required init?(coder aDecoder: NSCoder) {
    fatalError("init(coder:) has not been implemented")
  }

  override func viewDidLoad() {
    super.viewDidLoad()
  }
}
The last step will be to get our tabbed view back.
Open AppDelegate.swift and add the following code to didFinishLaunchingWithOptions:
  window = UIWindow(frame: UIScreen.main.bounds)
  window?.backgroundColor = .white

  let tabBarController = UITabBarController()
  tabBarController.setViewControllers([
    UINavigationController(rootViewController: FirstViewController()),
    UINavigationController(rootViewController: SecondViewController())
    ], animated: false)
  window?.rootViewController = tabBarController
  window?.makeKeyAndVisible()
Note: For simplicity’s sake I instantiate the TabBarController inside of AppDelegate. For more complicated (and production quality) applications I highly recommend extending
UITabBarControllerand performing your logic there.
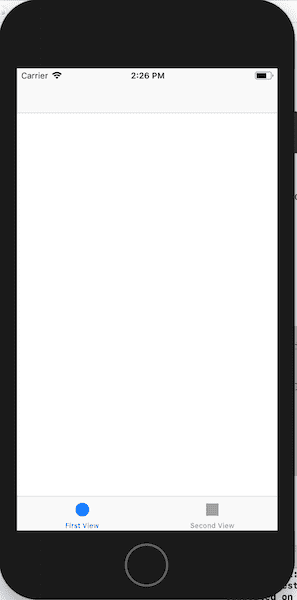
Your app should now look like this when you run it in the simulator:
We now have the basics out of the way and we’re ready to move on!
What Are Container Views?
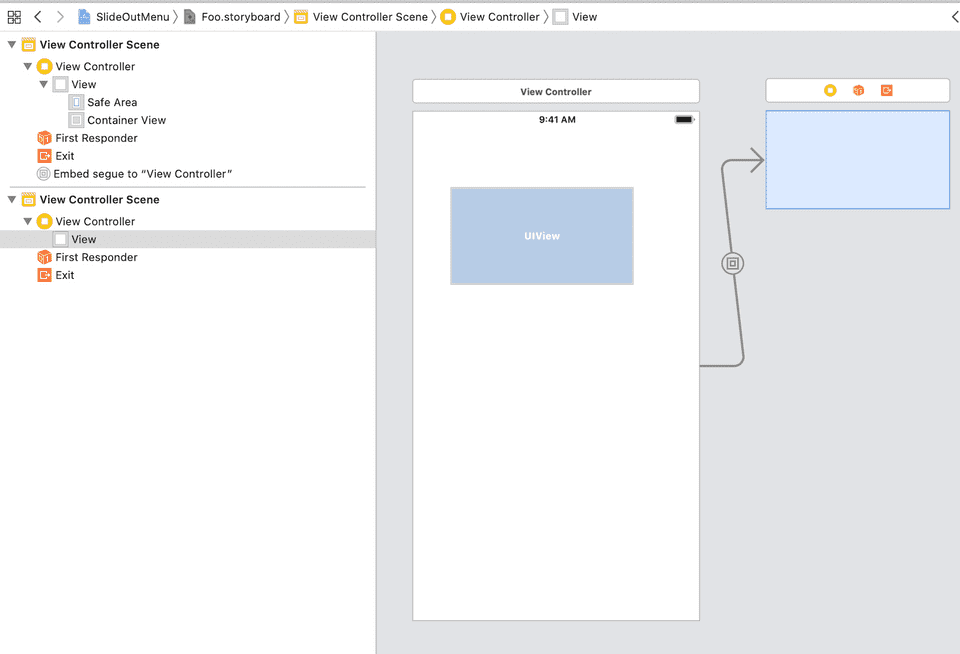
If you’ve ever worked with Interface Builder before you may have come across the Container View object. Here is a sample of what it looks like:
What you’ll notice is that the Container View is not a special type. Instead it consists of a regular UIView with an Embed segue to “View Controller.”
Interface Builder does all of this for you but there is no special magic to Container Views. We can leverage them programmatically just like we would a UITableView or a UIButton.
Programmatic Container Views
You need to call two of UIViewController’s API methods to get Container Views working within your code. First you need to call view.addSubview(myView) from your View Controller. Second, you need to call myView.didMove(toParent: self).
Here’s a small code snippet of what it looks like:
class MyViewController: UIViewController {
  private var child: UIViewController

  init(child: UIViewController) {
    self.child = child
    super.init(nibName: nil, bundle: nil)
  }

  required init?(coder aDecoder: NSCoder) {
    fatalError("init(coder:) has not been implemented")
  }

  override func viewDidLoad() {
    super.viewDidLoad()
    view.addSubview(child.view)    child.didMove(toParent: self)  }
}
The combination of calling these two methods in lines 15 and 16 is what setups up the relationship between parent and child views, thus creating a Container View.
As you can see setting up a Container View in code is not very complicated at all. Further, you don’t have to worry about segues or storyboards. Ultimately this results in a lot clearer code that should be much easier to maintain.
Thinking in Layers
Now that we have some of the concepts out of the way we have to think about what we’re trying to achieve. We are trying to create a slide out menu that animates out from the left and pushes the main content to the right.
Because the menu and the main content will butt up against each other and never overlap, the z-ordering seemingly doesn’t matter. That is, the call to addSubview() doesn’t seem to matter because one view will begin where the other ends. However, there is a slight issue. The main content area will contain our tabs and maybe even some navigation bar items (e.g. a button to toggle the visibility of the side menu).
Interactions are temporarily disabled during a call to UIView.animate and are re-enabled when the animation is completed or canceled. This means that once the animation completes, any buttons or table cells that are visible within the main content area will respond to tap gestures, or any other registered gestures. This behavior is not desirable because it could lead to weird interactions with a partially obscured screen. Imagine clicking on a table cell row while more than half the screen is taken up the slide out menu. Yuck!
The easy way to solve this is to add a UIView on top of the main content area so that gestures do not propogate down while the menu is visible. We have to pay close attention to the z-ordering of the child elements so that the side menu has the highest z-index, followed by the overlay (UIView), and finally the main content area.
MainAppViewController
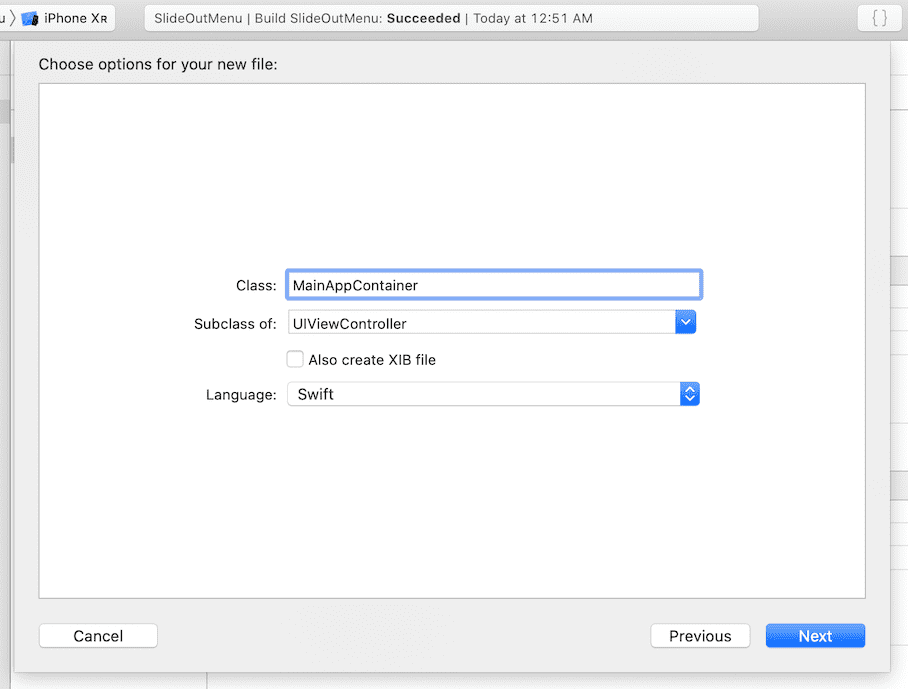
Go to your project in Xcode and create a new UIViewController and name it MainAppViewController.
This file will be responsible for two things:
- Adding Auto Layout constraints to the side menu and the main content area
- And animating the constraints to the proper end state
Import the SnapKit module because we are going to use it when we setup the Auto Layout constraints. Your file should look like the following:
import UIKit
import SnapKit

class MainAppViewController: UIViewController {

  override func viewDidLoad() {
    super.viewDidLoad()
  }
}
Add two private variables called sideMenu, and mainContent of type UIViewController.
Xcode will complain because your class doesn’t have any initializers. So let’s add them. Add the following code to your class:
  init(sideMenu: UIViewController, mainContent: UIViewController) {
    self.sideMenu = sideMenu
    self.mainContent = mainContent
    super.init(nibName: nil, bundle: nil)
  }

  required init?(coder aDecoder: NSCoder) {
    fatalError("init(coder:) has not been implemented")
  }
Your class should now look like this:
import UIKit
import SnapKit

class MainAppViewController: UIViewController {

  private var sideMenu: UIViewController
  private var mainContent: UIViewController

  init(sideMenu: UIViewController, mainContent: UIViewController) {
    self.sideMenu = sideMenu
    self.mainContent = mainContent
    super.init(nibName: nil, bundle: nil)
  }

  required init?(coder aDecoder: NSCoder) {
    fatalError("init(coder:) has not been implemented")
  }

  override func viewDidLoad() {
    super.viewDidLoad()
  }
}
A neat thing about this class is that sideMenu and mainContent can be any class so long as it is a UIViewController. This means mainContent can be a UITabbarController or a UICollectionView, or anything else so long as it is a UIViewController.
Another added bonus of MainAppViewController’s design is that it doesn’t need to care about where sideMenu and mainContent come from. So long as you fulfill it’s contract (constructor), MainAppViewController will handle the rest.
This is the basis of dependency injection. There are libraries that can help you with that on a system-level, but it doesn’t need to get anymore complicated than what we have here.
Finally, let’s add our backgroundOverlay which will be in charge of obstructing the mainContent area while the sideMenu is visible.
Now our class should look like this:
import UIKit
import SnapKit

class MainAppViewController: UIViewController {

  private lazy var backgroundOverlay: UIView = { UIView() }()
  private var sideMenu: UIViewController
  private var mainContent: UIViewController

  init(sideMenu: UIViewController, mainContent: UIViewController) {
    self.sideMenu = sideMenu
    self.mainContent = mainContent
    super.init(nibName: nil, bundle: nil)
  }

  required init?(coder aDecoder: NSCoder) {
    fatalError("init(coder:) has not been implemented")
  }

  override func viewDidLoad() {
    super.viewDidLoad()
  }
}
z-index Success
We have the basic building blocks in place to get our UI behaving the way we want. What we need to do next is to call addSubview in the corrct order so we get the results we expect.
Update the viewDidLoad method so it looks like the following:
  override func viewDidLoad() {
    super.viewDidLoad()

    view.addSubview(mainContent.view) // z-index: 0
    view.addSubview(backgroundOverlay) // z-index: 1
    view.addSubview(sideMenu.view) // z-index: 2
  }
z-index is determined by addSubview. The later you call addSubbview the higher the z-index for the element. In our code we are adding mainContent first so it will have the lowest z-index, then we add our backgroundOverlay so it will have a higher index, and finally we add sideMenu which will have the highest z-index.
Enable Container View
Remember, in order to designate a view controller as a container view we must establish a parent/child relationship between itself and any child views. We have completed half that task by calling addSubview. We must now implement the second half by calling the didMove(toParent:) method on the child views.
Update your viewDidLoad method with the following code:
  override func viewDidLoad() {
    super.viewDidLoad()

    view.addSubview(mainContent.view)
    view.addSubview(backgroundOverlay)
    view.addSubview(sideMenu.view)

    sideMenu.didMove(toParent: self)
    mainContent.didMove(toParent: self)
  }
We have our child views in the correct order and we have established our Container View relationship. Now we need to move onto the heart of our functionality and create our auto layout constraints.
Auto Layout and Animations
We all know that Auto Layout is a powerful mechanism for defining the look of our UI. It gives us a robust API that allows our UI to adjust depending on the rotation of the device, or the size of other elements, or even on the lack of elements. We can create references to individual constraints to modify them at runtime. With that in mind we turn our attention to the UIView.animate API.
UIView.animate gives us a way to animate properties of a view. You set an initial state for your UI and when you call animate you tell it what the end state should be. UIView.animate will take care of calculating (interpolating) the values from your initial state to your end state.
Imagine you have a view with an initial opacity set to 1.0. You want to animate the view’s opacity until it is 0, making it disappear from the screen. To do that you merely call animate like so:
  UIView.animate(withDuration: 0.25, animations: { [weak self] in
    self?.myView.layer.opacity = 0
  })
You call the animate method with the desired end state. It’s a nice, declarative API that handles a lot under the hood.
The same concept applies to constraints. Imagine you have a view with a leading constraint set to a constant of 40 points (i.e. a view 40px from the left). Let’s say that you want to animate that constraint to a constant of 0 (i.e. move it so it’s flush to the left). You achieve that as follows:
  // define an IBOutlet to a constraint somewhere..
  @IBOutlet var myLeadingConstraint: NSLayoutConstraint!

  UIView.animate(withDuration: 0.25, animations: { [weak self] in
    self?.myLeadingConstraint.constant = 0
  })
Initial Auto Layout Constraints
In order to animate our UI properly we need to first define what our UI looks like initially. Still within MainAppViewController, define a new method called addConstraints and call it from viewDidLoad.
  override func viewDidLoad() {
    ....
    addConstraints()
  }

  private func addConstraints() {
  }
Before we begin adding our constraints, let’s think about the relationship between sideMenu, mainContent, and backgroundOverlay.
We only want our side menu to take up 75% of our screen size when it is visible. It’s possible to define this as a constraint and update it as part of the animation, but it is much easier to calculate this value one time and cache it.
Our main content area should begin right where the side menu ends. When the side menu is hidden the main content area takes up the entire screen. When the side menu is visible the main content area takes up the remaining 25% of the screen. In effect, the side menu “pulls” the main content area to the left edge when it closes, or it “pushes” the main content area to the right when it opens.
This implies that the leading anchor constraint for the main content area will be equal to the trailing anchor constraint of the side menu.
Our background overlay should take up the entirety of the screen to prevent any interactions with the main content area below it.
Putting all of this together you end up with the following requirements:
- Calculate the width of the side menu (in our case 75% of total screen)
- Define constraints for side menu, including width constraint of 75%
- Define constraints for background overlay, and
- define constraints for main content area
Update the addConstraints method with the following code:
  // 1 Calculate menu width and cache it
  lazy var sideMenuWidth: CGFloat = { floor(view.frame.width * 0.75) }()
  ...
  // Use SnapKit to make Auto Layout code easier to write
  private func addConstraints() {
    // 2 define constraints and width for menu
    sideMenu.view.snp.makeConstraints { make in
      make.top.equalTo(0)
      make.leading.equalTo(-sideMenuWidth)      make.width.equalTo(sideMenuWidth)      make.height.equalToSuperview()
    }

    // 3 define constraints for background overlay
    backgroundOverlay.snp.makeConstraints { make in
      make.top.leading.equalTo(0)
      make.width.height.equalToSuperview()
    }

    // 4 define constraints for  main content area
    mainContent.view.snp.makeConstraints { make in
      make.top.equalTo(0)
      make.leading.equalTo(sideMenu.view.snp.trailing)      make.width.height.equalToSuperview()
    }
  }
SnapKit makes writing auto layout code a lot more convenient and terse. The API is intuitive and easy to learn. If you aren’t familiar with it I encourage you to look at their documentation.
You’ll notice on line 9 that we set the initial leading constraint to the negative value of sideMenuWidth. Basically, we are offsetting the view by the width amount offscreen (to the left).
Then on line 10 we set the width constant to the sideMenuWidth value.
Finally on line 23 we set the mainContent leading constraint equal to the sideMenu trailing constraint.
Our MainAppViewController class should look as follows:
import UIKit
import SnapKit

class MainAppViewController: UIViewController {

  private lazy var backgroundOverlay: UIView = { UIView() }()
  private lazy var sideMenuWidth: CGFloat = { floor(view.frame.width * 0.75) }()

  private var sideMenu: UIViewController
  private var mainContent: UIViewController

  init(sideMenu: UIViewController, mainContent: UIViewController) {
    self.sideMenu = sideMenu
    self.mainContent = mainContent
    super.init(nibName: nil, bundle: nil)
  }

  required init?(coder aDecoder: NSCoder) {
    fatalError("init(coder:) has not been implemented")
  }

  override func viewDidLoad() {
    super.viewDidLoad()

    view.addSubview(mainContent.view)
    view.addSubview(backgroundOverlay)
    view.addSubview(sideMenu.view)

    sideMenu.didMove(toParent: self)
    mainContent.didMove(toParent: self)

    addConstraints()
  }

  private func addConstraints() {
    sideMenu.view.snp.makeConstraints { make in
      make.top.equalTo(0)
      make.leading.equalTo(-(sideMenuWidth))
      make.width.equalTo(sideMenuWidth)
      make.height.equalToSuperview()
    }

    backgroundOverlay.snp.makeConstraints { make in
      make.top.leading.equalTo(0)
      make.width.height.equalToSuperview()
    }

    mainContent.view.snp.makeConstraints { make in
      make.top.equalTo(0)
      make.leading.equalTo(sideMenu.view.snp.trailing)
      make.width.height.equalToSuperview()
    }
  }
}
Defining View State
We need a way to store our current view state in order to drive our animations properly. We need to be able to determine whether the view state is visible or hidden.
For this we will define an enum called MenuViewState and a variable called currentState that will store the current value of the state.
  enum MenuViewState {
    case hidden
    case visible
  }
  private var currentState: MenuViewState = .hidden
Defining Animations
We’ve defined our initial constraints and view state which make our animation code a lot simpler. To animate the side menu so that it is open we use the following code:
  UIView.animate(withDuration: 0.25, animations: { [weak self] in
    self?.sideMenu.view.snp.updateConstraints { make in
      make.leading.equalTo(0)
    }
    self?.view.layoutIfNeeded()
  })
That’s it! Updating the leading constraint on side menu will trigger the other constraints to recalculate and adjust accordingly. 🤯
To animate the side menu back to a hidden state we use the following code:
  UIView.animate(withDuration: 0.25, animations: { [weak self] in
    self?.sideMenu.view.snp.updateConstraints { make in
      make.leading.equalTo(-menuWidth)
    }
    self?.view.layoutIfNeeded()
  })
Wow! That looks almost like the previous snippet of code. The difference is we animate the constraint back to the negative width value we calculated before.
You’ll notice that our code doesn’t do anything to update the value of currentState. We can do that after our call to animate. Let’s DRY up our code a bit and add a helper method called animateMenu(open: Bool).
  private func animateMenu(open: Bool) {
    UIView.animate(withDuration: 0.25, animations: { [weak self] in
      self?.sideMenu.view.snp.updateConstraints { make in
        if open {
          make.leading.equalTo(0)
        } else if let menuWidth = self?.sideMenuWidth {
          make.leading.equalTo(-menuWidth)
        }
      }
      self?.view.layoutIfNeeded()
    })
    currentState = open ? .visible : .hidden
  }
It’s the same logic as before but now driven by a flag (open) based on the current view state.
Triggering Animations
We have all of our code in place to get our desired behavior except that we don’t have a way to trigger the animation. Let’s fix that by adding the following method to our class:
  func toggleSideMenu() {
    animateMenu(open: currentState == .hidden)
  }
This public method will allow any other class to trigger our animation.
Update FirstViewController
Let’s add a button to our FirstViewController.swift file to trigger our animation.
private lazy var button: UIButton = { UIButton(type: .custom) }()Next in viewDidLoad let’s add some styling, constraints, and a target to our button.
  override func viewDidLoad() {
    super.viewDidLoad()

    button.backgroundColor = .red
    button.contentEdgeInsets = UIEdgeInsets(top: 8, left: 8, bottom: 8, right: 8)
    button.layer.cornerRadius = 8
    button.setTitle("Show Side Menu", for: .normal)
    button.addTarget(self, action: #selector(showSideMenu), for: .touchUpInside)
    view.addSubview(button)

    button.snp.makeConstraints { make in
      make.centerX.centerY.equalToSuperview()
    }
  }
Define the target method that will handle the tap gesture.
  @objc func showSideMenu(_ sender: UIButton) {
    print("tap tap")
  }
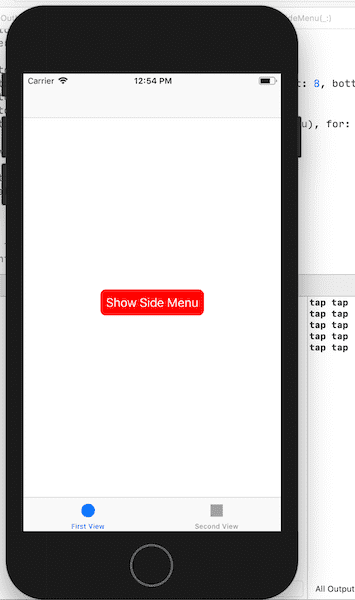
Run the simulator and you should see the following.
Coordinators
As you can see, our button doesn’t do much of anything right now. We have to wire it up so that it can call the toggleSideMenu method of the MainAppViewController class. We could pass in an instance of MainAppViewController to FirstViewController but there is a problem. FirstViewController is part of our UITabBarController which in turn is part of our mainContent area. Passing in an instance to FirstViewController would create a circular reference which could lead to bugs.
What we need is some kind of middle layer that mediates between MainAppViewController and our View Controllers. A popular pattern to accomplish this is called the Coordinator Pattern first introduced by Soroush Khanlou. It is worth your time to read up on this pattern if you aren’t familiar with it.
Implementing this pattern is out of scope for this tutorial (which is already very long 😂), but we can still leverage the concept.
Adding a Mediator
Open AppDelegate.swift and add the following property.
var mainAppVC: MainAppViewController?This will be our rootViewController of our window object. Update the didFinishLaunching method so it looks like the following.
  window = UIWindow(frame: UIScreen.main.bounds)
  window?.backgroundColor = .white

  let tabBarController = UITabBarController()
  tabBarController.setViewControllers([
    UINavigationController(rootViewController: FirstViewController(appDelegate: self)),    UINavigationController(rootViewController: SecondViewController())
    ], animated: false)

  let menu = UIViewController()  menu.view.backgroundColor = .yellow  mainAppVC = MainAppViewController(sideMenu: menu, mainContent: tabBarController)  window?.rootViewController = mainAppVC  window?.makeKeyAndVisible()
You’ll notice that we’ve updated FirstViewController to take in an instance of AppDelegate in its constructor. We will update that in a bit, but let’s move on for now.
Next you’ll notice that I created a dummy “menu” view controller (just for illustrative purposes) that we pass into MainAppViewController as the side menu.
Finally, we instantiate MainAppViewController passing in both the dummy menu view controller and our tab bar controller.
This won’t compile because we need to first update FirstViewController. Open up FirstViewController.swift and add the following code.
  private var appDelegate: AppDelegate
  init(appDelegate: AppDelegate) {
    self.appDelegate = appDelegate
    super.init(nibName: nil, bundle: nil)

    self.tabBarItem = UITabBarItem(title: "First View", image: UIImage(named: "first"), tag: 0)
  }

  @objc func showSideMenu(_ sender: UIButton) {
    print("tap tap")

    appDelegate.toggleSideMenu()  }
We added a property called appDelegate which we will use in our tap handler to call the toggleSideMenu method (line 14).
The complete file looks like this.
import UIKit
import SnapKit

class FirstViewController: UIViewController {
  private lazy var button: UIButton = { UIButton(type: .custom) }()
  private var appDelegate: AppDelegate

  init(appDelegate: AppDelegate) {
    self.appDelegate = appDelegate

    super.init(nibName: nil, bundle: nil)

    self.tabBarItem = UITabBarItem(title: "First View", image: UIImage(named: "first"), tag: 0)
  }

  required init?(coder aDecoder: NSCoder) {
    fatalError("init(coder:) has not been implemented")
  }

  override func viewDidLoad() {
    super.viewDidLoad()

    button.backgroundColor = .red
    button.contentEdgeInsets = UIEdgeInsets(top: 8, left: 8, bottom: 8, right: 8)
    button.layer.cornerRadius = 8
    button.setTitle("Show Side Menu", for: .normal)
    button.addTarget(self, action: #selector(showSideMenu), for: .touchUpInside)

    view.addSubview(button)

    button.snp.makeConstraints { make in
      make.centerX.centerY.equalToSuperview()
    }
  }

  @objc func showSideMenu(_ sender: UIButton) {
    print("tap tap")

    appDelegate.toggleSideMenu()
  }
}
Run the simulator and you will notice that nothing happens! Can’t click on anything.
Final Steps
Everything is in place and should work except that it doesn’t. What gives? Remember that background overlay we added to our MainAppViewController? Well, it’s doing its job and is blocking all interactions! Clearly we don’t want it active while the menu is hidden so we need to update our code a bit.
Open up MainAppViewController.swift and add the following code right above the constraint definitions for the backgroundOverlay.
  backgroundOverlay.backgroundColor = .lightGray  backgroundOverlay.layer.opacity = 0
  backgroundOverlay.snp.makeConstraints { make in
    make.top.leading.equalTo(0)
    make.width.height.equalToSuperview()
  }
We also need to update the opacity during the animation. Update the animateMenu(open:) method with the following.
  UIView.animate(withDuration: 0.25, animations: { [weak self] in
    self?.backgroundOverlay.layer.opacity = open ? 0.35 : 0.0    self?.sideMenu.view.snp.updateConstraints { make in
      if open {
        make.leading.equalTo(0)
      } else if let menuWidth = self?.sideMenuWidth {
        make.leading.equalTo(-menuWidth)
      }
    }
    self?.view.layoutIfNeeded()
  })
This will update the opacity from 0 to 0.35 when we open the side menu and from 0.35 to 0 when we close it.
Run the simulator again and now you should be able to click on the red button. (Remember, the complete source is available on my github profile if you get lost).
The side menu animates! But… there is another problem. How do we close the side menu when the button is blocked by the backgroundOverlay?
A solution is to add a tap gesture recognizer to the overlay and trigger the animation.
Still within MainAppViewController add the following code to the end of viewDidLoad.
  override func viewDidLoad() {
    ...
    let tapGestureRecognizer = UITapGestureRecognizer(target: self, action: #selector(toggleSideMenu))    backgroundOverlay.addGestureRecognizer(tapGestureRecognizer)
  }
Notice that the selector we use is the same toggleSideMenu method. In order for this to work we need to update the signature of the method and add @objc at the beginning like so.
  @objc func toggleSideMenu() {
    animateMenu(open: currentState == .hidden)
  }
Run the simulator again and now you should be able to click on the red button to show the side menu and click on the backgroundOverlay to hide it again. 🤩
Wrapping Up
This article got a lot longer than I anticipated, but I thought I would try to be as thorough as possible so you can get a glimpse into the why and not just the how. As mentioned before you can find the full source here.
In a future article we will update this code to also handle a pan gesture. Feel free to reach out if you have any questions. Happy coding. 🙂
